
Explore interior trends, AI design insights, styling guides and real transformations
Designing the Perfect Kitchen Island: Practical Size, Shapes and Styles for European Homes
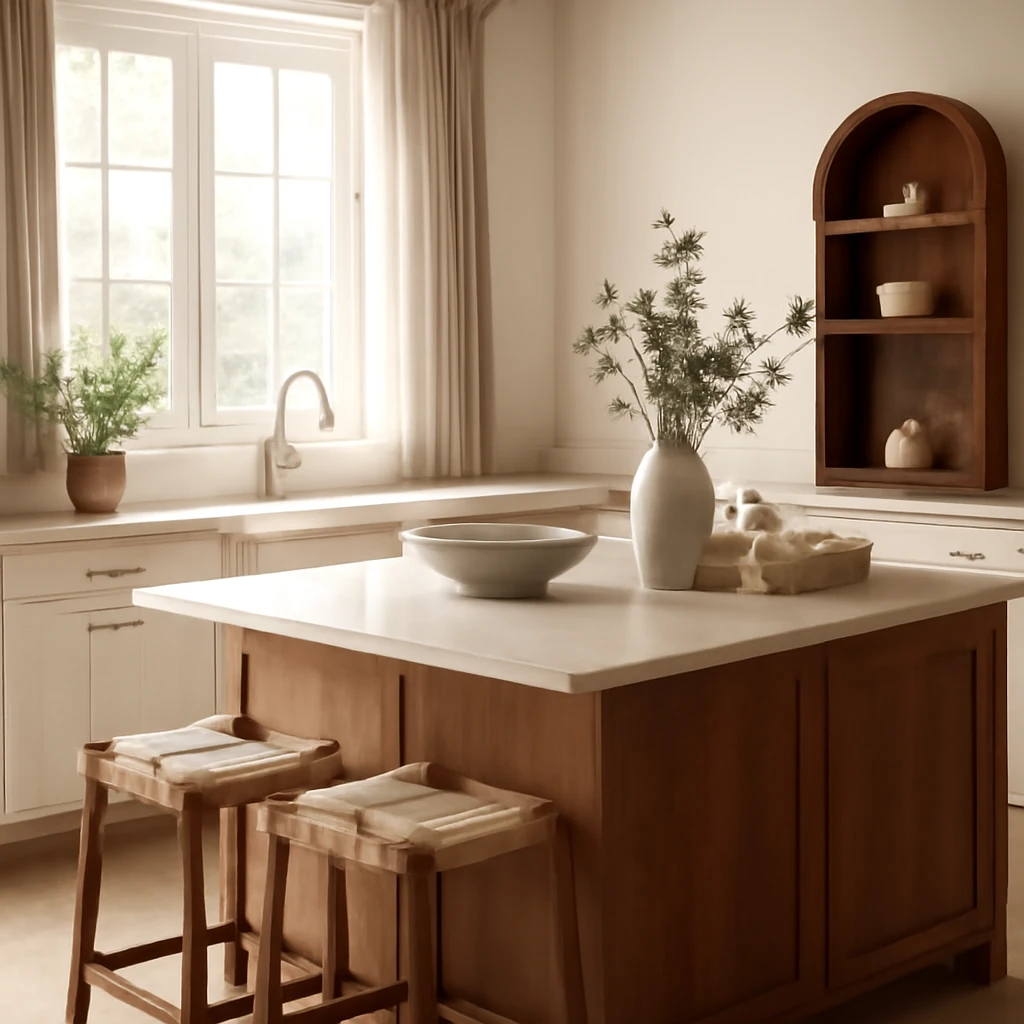
Introduction: the kitchen island as the social heart
What links beloved film and television kitchens across Europe? Not the era or the show, but a design truth: a well‑planned kitchen island creates a generous, sociable hub within an open living space. It is where cooking, chatting and snacking merge, where storage can disappear into cabinetry, and where a casual breakfast bar invites friends and family to linger. In many European homes, where space is precious and layouts vary from compact city apartments to generous sixties‑and‑seventies shells, the island offers a flexible, human‑centred solution. This article guides you through planning, sizing, forms, materials and technologies so you can realise a kitchen island that feels built for life, not just for style.
Below you will find a comprehensive framework tailored for contemporary European homes: how to begin planning, how to determine dimensions, which forms work best in different spaces, the right clearance around the island, how to incorporate seating, and which materials and finishes deliver longevity and appeal. The aim is practical guidance that respects local building practices, household routines and energy efficiency, without compromising on beauty.
Why a kitchen island? Core benefits for European living
A properly conceived kitchen island does more than extend work surface. It concentrates function in a single, socialisable element that can be tailored to the home, the family and the way you move through space. In open‑plan configurations common in many European flats and houses, an island can:
- Increase work surface: a generous, stand‑alone work zone for chopping, assembling and plating, with the option to keep a separate culinary triangle intact elsewhere.
- Provide storage where it matters: hidden drawers, deep pull‑outs and wall cabinets can house cookware, utensils, and small appliances, keeping the main work line uncluttered.
- Create a casual dining area: a breakfast bar with bar stools is ideal for quick meals, informal chats, and supervising children while they do homework.
- Improve workflow: by integrating cooking zones, sinks and built‑in appliances, you can streamline the kitchen triangle while maintaining sightlines to the living area.
- Define zones in open plans: a well‑placed island can visually separate kitchen from living or dining zones yet maintain a sense of continual space.
For European homes - with varied footprints, compact urban kitchens and occasionally irregular walls - the island also acts as a clever way to reorganise circulation. The right proportions and placement can transform a cramped kitchen into a welcoming centre of the home.
How to begin planning: the essential questions
Before drawing any plans, consider how the island will be used and by whom. Start with concrete questions that anchor your design decisions:
- How many people will use the island at the same time?
- Will you integrate built‑in appliances (cooktop, sink, dishwasher) into the island, and which devices are essential?
- What should be stored under the countertop, and what items will live in nearby cabinetry?
- How will access to the work triangle (cooktop, sink, fridge) be arranged, and can doors or drawers open fully without obstruction?
- Will the island double as a dining surface, and should seating be at the height of a bar or a formal counter?
In practice, many European kitchens benefit from an island configuration when the overall kitchen area is roughly 16 square metres or larger. Smaller spaces can still work with compact peninsulas (one end attached to a wall) or a slim island that preserves circulation and allows for essential tasks without crowding the room.
How to determine the island’s dimensions
Dimensioning the island involves a careful balance between ergonomics, circulation and the space available for movement. Here is a practical approach you can adapt to most European floor plans:
- Measure the room precisely, noting fixed elements such as cabinets, doors and columns. Mark any protrusions or irregularities on a scaled plan.
- Reserve clearances for movement: a minimum of 90 cm of unobstructed space between the island and adjacent cabinetry is advisable for comfortable access to drawers and appliances.
- Estimate the maximum possible island dimensions for ergonomic use. A standard work surface height is typically 85–90 cm. Other dimensions depend on the available clearances and seating requirements.
As a rough rule of thumb, the maximum width of an island is constrained by the room’s width minus the depth of the surrounding units and the two walkways flanking the island. The length similarly depends on the amount of wall space available for cabinets, a sink or a cooking zone, and the need for passage along both sides.
In practice, ensure that doors facing the island can open fully without collision, and that any island feature such as a sink or hob does not impede traffic or the other users in the room.
What sizes work best: small, medium or large island formats
Size directly influences function and relationship to other furniture. Here are commonly adopted dimensions, with practical implications for European kitchens.
- Small island - approximately 60 × 120 cm. This is primarily a work module with limited seating (usually for 1–2 people). It suits compact kitchens where the primary aim is extra prep space and a casual dining edge.
- Medium island - roughly 90 × 150 cm. This size accommodates a working area plus a modest bar area or integrated storage. It is a popular compromise in mixed use spaces, enabling more room for helpers and family conversation while cooking.
- Large island - around 100 × 200 cm or larger. A generous island can host a sink, cooking zone, full cooking or baking suite, plus a real dining space for 4–5 people. It offers substantial storage and occupies a commanding presence in the room.
Note that simply enlarging the island is not always the best solution. A single monolithic block over 240 cm long can be difficult to transport and install, and multi‑section islands may leave visible seams that interrupt the visual flow. The aim is a cohesive, well‑integrated module that suits your routine rather than a flagship feature that creates maintenance challenges.
Shapes and configurations: which form suits your space?
The array of shapes is vast, but the practical needs are straightforward. Here are the most common configurations and what they offer in European homes.
- Rectangular - the most versatile for most kitchens. It accommodates appliances on the longer axis and offers generous seating on one side.
- Square - works well in larger spaces when the island can host a sink or hob on the central portion. It’s balanced visually in square rooms but requires more floor area.
- L‑ and U‑shaped islands - ideal for creating distinct work zones (prep, cooking, washing) and storage pockets while maintaining an open plan. These configurations can act as room dividers without interrupting sightlines.
- Round or oval - a striking option for contemporary interiors. While they look elegant, they can complicate standard appliance integration and often need bespoke solutions.
- Peninsula - one end attached to a wall or cabinetry, offering a cost‑effective alternative to a freestanding island while maintaining a sense of shared space.
Clearance and overhang: ensuring comfort and practicality
Clearance around the island is crucial for safe and comfortable use. The following guidelines apply in most European homes:
- Minimum walking clearance between the island and surrounding units: 90 cm. If drawers, doors or integrated appliances are on the island’s sides, aim for 100–120 cm to allow full access when multiple people are moving around the space.
- If you plan bar seating, consider an additional 110–120 cm clearance on the seating side to permit generous leg room and easy entry and exit from stools.
- Overhang of the countertop: a standard overhang of 30–40 cm is comfortable for most diners. If seating is required along a long edge, a longer overhang on that side may be appropriate, but always ensure structural support is adequate.
When the island doubles as a dining area, one long side with a deeper overhang can visually reinforce the dining edge while keeping the other work surfaces compact and efficient. To maintain safety and longevity, consider professional supports for heavy materials and steel brackets for unobtrusive reinforcement.
Materials: choosing surfaces that endure in European homes
The choice of materials for a kitchen island affects maintenance, durability, heat resistance and aesthetics. A broad palette works across Europe, from timber‑led rural kitchens to sleek urban schemes. Typical options include:
- Wood, MDF or moisture‑resistant laminates - commonly used for façades, shelves and interior drawers. Choose water‑resistant finishes in humid climates or where splashes are frequent.
- Metal - primarily for the structural frame, supports and sometimes for hardware or detailing. It pairs well with contemporary schemes and industrial aesthetics.
- Marble and granite - luxurious and durable but high‑maintenance and costly, best reserved for attractive focal points or panelled edges rather than all surfaces.
- Engineered stone or quartz composite - top performers for durability, stain resistance and low maintenance. A practical favourite for European kitchens with heavy use.
- Tempered glass - visually light and modern, but requires careful maintenance and usage due to fingerprints and smudges.
In balancing price, performance and look, engineered stone and quality laminate remain common Swiss Army knife options for European homes. When planning, weigh the daily realities of life in your home - the likelihood of heat exposure, moisture and potential impact from family activities - to pick the finish that will endure for years.
Technical considerations: power, plumbing and ventilation
An island is as much a technical project as a design feature. Critical considerations include:
- Electrical supply: pre‑lay cables to power outlets and consider retractable or concealed block outlets to keep surfaces clean. Plan outlets for small appliances and charging needs without visual clutter.
- Plumbing and drainage: if you plan to place a sink on the island, ensure adequate slope and access to waste lines. For autumn and winter tasks, allow for drainage height and possible siphon space in the island depth.
- Ventilation: a dedicated island hood above the cooktop is common, for fridges and wine storage, ensure appropriate ventilation channels in the cabinetwork to prevent heat buildup.
- Lighting: combine integrated lighting (under‑cabinet or concealed LED strips) with pendant or track lighting positioned to avoid glare on the work surface. For practical use, place pendant lights around 70–90 cm above the countertop, depending on ceiling height and seating arrangement.
Where the island carries essential functions, a professional installation is advisable to ensure electrical, plumbing and ventilation meet local building regulations and energy efficiency standards. A well‑executed technical plan reduces maintenance costs and protects your investment for years to come.
Styles: four island personalities to harmonise with your kitchen
To integrate the island with your overall kitchen scheme, the module should echo the surrounding cabinetry and architectural language rather than shout as a separate object. Here are four enduring European styles and how an island can participate in each:
- Country: warm, tactile materials and a comfortable, lived‑in vibe. Think timber façades, a weathered timber work surface and rustic iron hardware. The island can feature open shelves for baskets or ceramics to emphasise a welcoming, handmade atmosphere.
- Classic / Classical: symmetry, refined detailing and luxurious materials. A pale palette with white or stone‑coloured façades, marble or granite counters, and gold or brass accents can create a timeless, elegant centrepiece. The island’s proportion should mirror the surrounding cabinetry for a harmonious silhouette.
- Minimalist: a clean, uncluttered approach with clear lines, concealed storage and a restrained palette. Integrated appliances, flush surfaces and softly finished edges help the island blend into the room while still delivering practical function.
- High‑Tech: a technology‑driven, sleek environment with touch‑responsive outlets, concealed lighting and smart controls. Materials tend to be cool and glossy, and the island often houses advanced appliances and passive cooling or ventilation strategies.
These styles illustrate how the island can be both functional and stylistically coherent with the rest of the home. When designing, ensure the island’s footprint and materials support the chosen aesthetic and do not compete with the surrounding architecture within your space.
Pros and cons of island layouts
As with any layout choice, islands bring advantages and potential drawbacks. Understanding these helps you decide whether an island is right for your home.
Pros
- Ergonomic, well‑considered workspace for cooking and plating, with built‑in storage integrated where it matters.
- Distinct yet cohesive visual focal point that can unify an open plan and define zones without walls.
- Facilitates social interaction with guests and family during food preparation and meals.
- Opportunity to tuck away bulky equipment beneath the countertop and free up wall space for slim cabinetry or appliances elsewhere.
- Flexible zoning in rooms that merge kitchen, dining and living areas, aiding circulation and social connectivity.
However, there are realities to manage: the island’s footprint must be harmonised with room size, and the footprint should be rational in relation to plumbing, electricity, and drainage work. In smaller spaces the island can become a constraint rather than a catalyst for better living, so measurement and planning are essential.
Cons
- On very small kitchens, an island might overwhelm space and hinder movement, in such cases, a peninsula or a compact island with restricted seating may be a wiser choice.
- Inadequate electrical or plumbing planning can lead to costly rework and unsightly service routes.
- Poorly chosen finishes can show wear or staining quickly in a high‑traffic kitchen environment, maintenance needs should guide material choice.
Integral planning: measurement, fit and final checks
To translate theory into a successful installation, use these practical steps as a checklist during design and build:
- Carry out precise room measurements, including all protrusions and fixed features. Create a scaled plan showing the island position and all clearance zones.
- Test circulation by marking the recommended 90–120 cm walkways on the plan. If the room is narrow, consider how to reallocate furniture or cabinets to ensure clear paths for doors and drawers to open fully.
- Define the island’s role early: dining, cooking, prep or a hybrid. The intended function will guide the size, shape and height choices.
- Decide how many seating places you require and the corresponding overhang, taking into account leg room and comfort. A standard bar height stool requires a counter overhang of around 30–40 cm, with additional space for elbow clearance.
- Coordinate with the location of electrical outlets, water supply and drainage. River floors or underfloor heating require careful routing to avoid future disputes or leaks.
Ultimately, the visual height and alignment of the island with adjacent cabinetry should feel deliberately connected. The island should not appear as an afterthought but as a design‑led extension of the kitchen’s architecture.
What to consider for the island height and seating ergonomics
The standard island height aligns with typical kitchen work surfaces, around 85–90 cm. If you want a dedicated dining edge or bar seating, you may elevate the bar portion by about 10–15 cm to 100–105 cm, balancing comfort and practicality for average adult height. For households with children, consider a dual‑height option or an adaptable edge to align with seating preferences and reach.
Seat depth is commonly 25–30 cm for stools, enabling comfortable leg positioning under the overhang. A longer island may accommodate both a full prep zone and a casual seating edge, but ensure the seating portion has a dedicated, uninterrupted legroom area and does not obstruct the primary work zones.
Storage, appliances and handling: what goes where?
Islands present an opportunity to design storage that optimises workflow. Practical layouts include:
- Under‑counter storage: drawers and pull‑outs for pots, pans, utensils, and lids. Deep drawers are particularly useful for heavy items.
- Integrated appliances: a compact induction hob, a downdraft extractor or an upward vent, or a compact dishwasher, depending on your space and needs.
- Appliance zoning: keeping the sink and cooking zone on the island encourages a smooth work triangle while preserving counter depth on the wall units for other appliances.
- Hidden cable routes: plan concealed channels for small electrics to minimise visible cords and maintain clean surfaces.
Popular materials to consider for European homes
Selecting surfaces for the island should balance durability with aesthetics and maintenance. Considerations include:
- Wood and wood veneers: warm, tactile and adaptable, consider moisture resistance and sealing for kitchens with significant humidity or splash risk.
- Laminate and laminated MDF: cost‑effective, durable and available in a wide range of colours and textures, excellent for open‑plan schemes that require light, contemporary finishes.
- Metal accents: used for frames, fascias or hardware, enhances industrial or modern aesthetics while providing robust hardware for frequent use.
- Stone surfaces: marble and granite create a premium feel but require more maintenance and care, consider sealing and regular upkeep to maintain appearance in a busy kitchen.
- Engineered stone / quartz: high durability, uniform appearance, resistance to stains and scratches, widely used on European islands for longevity.
- Glass and acrylic surfaces: offer a lighter, contemporary look but may require more frequent cleaning and careful handling.
Lighting and ambience: two layers of illumination
Lighting the island is essential for both function and ambience. Combine task lighting with ambient or decorative lighting to create a balanced environment. Practical guidance includes:
- Install adjustable pendant lights or a linear pendant array over the dining edge to provide direct light for meals and socialising.
- Use under‑counter lighting to illuminate work surfaces and highlight textures in the island cabinetry.
- Consider dimmable lighting to adapt to different moods and times of day, from bright prep to warm evening dining.
Putting it together: four example styles in harmony with European living
For each style, the island should echo or complement the surrounding space rather than clash with it. Here are concise direction notes for successful integration:
- Country style: natural timber or timber‑look veneers, stone or timber countertops, soft, earth‑toned palettes, open shelving and warm brass hardware reinforce a lived‑in feel throughout the kitchen and living space.
- Classic / Traditional: refined details, pale stone counters, white or warm beige cabinetry with subtle mouldings. The island acts as a centrifugal point that coordinates with the surrounding period‑inspired architecture.
- Minimalist: pared‑back palettes (whites, greys, soft neutrals), integrated appliances, flush hardware and seemingly seamless surfaces that push the island into the background while still offering practicality.
- High‑Tech: tactile surfaces with smart features, power and data connectivity, concealed controls and cutting‑edge lighting that elevates the sense of modern living while preserving clean lines.
Pros and cons revisited: the practical verdict
Every project hinges on context. An island can be transformative in a well‑proportioned space, but in a cramped city apartment it may complicate circulation. The key is to balance size, function and aesthetics to deliver a module that feels inevitable rather than imposed.
Bottom line: turning plans into a successful kitchen island
1) Treat the island as a design and functional anchor for the kitchen. 2) Build planning around real life - how you cook, eat and interact. 3) Ground the decision in accurate measurements and practical clearances. 4) Choose materials that wear well in your climate and daily life. 5) Ensure electrical, plumbing and ventilation are integrated from the outset. 6) Partner with professionals who understand European building codes and energy standards to deliver a safe, stylish and enduring solution.
Q&A: common queries when sizing and planning a standalone module
What should I bear in mind when calculating the size of a standalone module?
First, assess the number of people in the household, their patterns of use and how the space will be used throughout the day. Consider the kitchen’s overall size and the layout of adjacent rooms. The island must support the required functions without obstructing movement or the operation of appliances. It is often a better strategy to prioritise proportion and ergonomics over sheer scale.
In many European homes, a practical starting point for planning is a working island around 90 × 150 cm, with a seating edge that can accommodate two to four people depending on the arrangement. In truly compact kitchens, a slim peninsula or a compact 60 × 120 cm island can still deliver a useful prep area and a small seating zone without dominating the space.
What mistakes should be avoided when designing?
- Ignoring circulation - ensure that the island does not block doors or make drawer openings obstructive when someone passes by.
- Poor planning of utilities - lay out electrical outlets, water supply and drainage with professional guidance to prevent costly late adjustments.
- Inadequate outlets - provide enough outlets not just for appliances but also for charging devices and other daily uses, keep cords tidy and out of the main work area.
Finally, avoid overestimating the island’s capabilities: there is no substitute for thoughtful design that considers how a family lives, rather than a single moment of display. A well‑conceived island should feel inevitable within the scheme, not like an afterthought.
How a kitchen island can elevate your European kitchen workflow
Beyond the aesthetics, the island acts as a reliable workhorse. When thoughtfully specified, it enables families to cook together, share meals with ease and enjoy a flexible living space that adapts to daily life. It can simplify the maintenance of surrounding walls and counters by containing traffic and concentrating activity in a controlled zone. Most importantly, it supports a sense of home: an island that is comfortable to use, easy to clean and pleasing to look at becomes the stage for daily rituals and shared moments.
Conclusion: a plan you can live with
Designing and installing a kitchen island is a multi‑step process that blends geometry, materials, and human behaviour. Start with a clear understanding of how you live in your kitchen today and how you want to live tomorrow. Measure meticulously, plan clearances, and choose finishes that withstand daily wear while remaining visually cohesive with your overall kitchen and living space. The right island will not only add functionality and storage but will also shape the character of your home, turning it into a welcoming place for conversation, cooking and celebration.
You may also like these articles
 Tips & How-To
The Chair You Need: How Size, Shape and Tilt Define Comfort in European Homes
A practical guide to choosing chairs that fit you and your home.
Renovation
Breathing new life into a European secondary flat: a renovation guide
A European guide to transforming a secondary apartment with smart design and durable solutions.
Interior Design
Artful Interiors: How to Choose, Size and Place Paintings Across European Homes
A design-forward guide to paintings in European interiors.