
Explore interior trends, AI design insights, styling guides and real transformations
Capitonné Headboard: A DIY Guide to Luxurious Tufted Upholstery
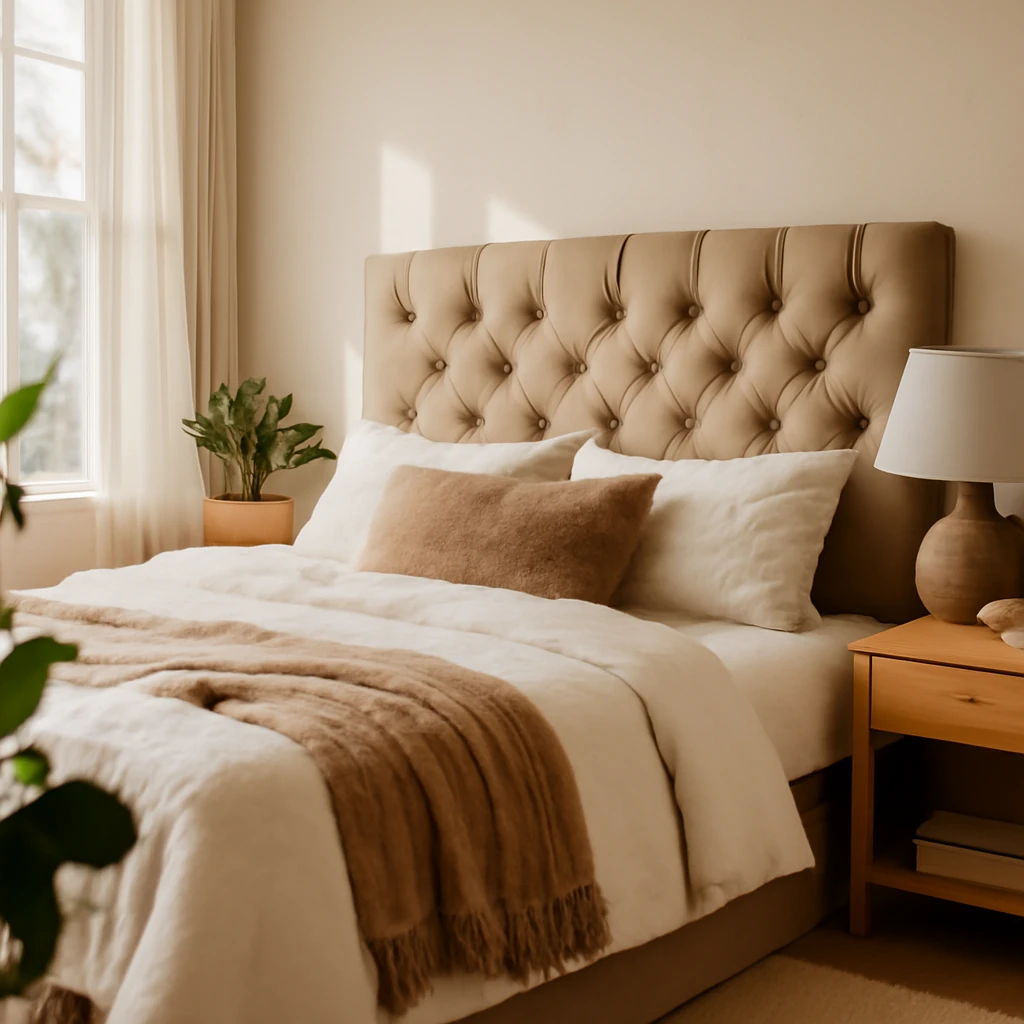
Introduction: a timeless focal point for European bedrooms
Capitonné tufted headboards have long been a favourite in European bedrooms, bringing quiet luxury and tactile warmth to a space. A well-executed headboard can soften the acoustic of a room, visually anchor a bed, and elevate a simple sleeping area into a refined ambience. For those who enjoy DIY projects and want to avoid bespoke furniture costs, a capitonné headboard offers an approachable yet sophisticated solution. This guide explains how to convert a sturdy frame into a professional-looking, upholstered headboard using common materials, careful planning, and patient craftsmanship.
Design considerations for European bedrooms
Before you pick up tools, take a moment to refine the design parameters. The key is to balance scale, proportion, and material with the size of your bed and the surrounding room.
- Bed sizes and scale: In Europe, common widths range from 140 cm (small double) to 160 cm, 180 cm, and sometimes 200 cm. A headboard should be wide enough to frame the bed without overpowering adjacent furniture. A typical headboard height is between 90 and 130 cm, depending on ceiling height and the look you want - low and contemporary or tall and dramatic.
- Tufting pattern and density: A diamond (capitonné) pattern creates a classic, tailored appearance. The spacing between stitches determines the sense of pattern - from tight grids to more generous diamonds. If you are new to tufting, start with a modest grid (e.g., 6–8 cm between stitches) and adjust to taste as you gain confidence.
- Frame and depth: A solid inner frame is essential. The headboard can be mounted directly to the bed frame, or built as a freestanding panel that sits behind the bed. Depth should be proportional to the mattress thickness and the overall room feel, a depth of 6–12 cm creates a comfortable cushion without overwhelming the bed.
- Materials and finish: Natural fabrics such as linen, cotton, or bouclé exude timeless elegance, while velvet or faux leather offers a more contemporary or luxurious mood. Consider fabric durability, stain resistance, and cleaning methods, especially in bedrooms with high traffic or little children.
- Lighting and surroundings: Plan for lighting that flatters the tufted surface. Wall lamps or concealed LED strips along the top edge can highlight the texture without creating glare on fabric folds.
Materials and tools: what you’ll need
Gather a practical mix of structural components, padding, fabric, and tools. The exact quantities depend on the bed width and chosen pattern, but the list below provides a dependable starting point for a standard European double to king-size bed (140–180 cm width). For a 180 cm bed, you may need roughly 24–40 decorative buttons depending on spacing.
- Frame components: a sturdy base from an old headboard, or cut panels of timber/MDF to size, enough to build a complete frame matching the bed width. If reusing an old frame, check that it can be reinforced with additional cross-members and brackets.
- Foam: two sheets of medium-density foam, each 2–4 cm thick, cut to the frame size. A slightly thicker top layer can contribute to a softer silhouette when tufted.
- Batting and fabric: a layer of soft batting to smooth transitions, plus a durable fabric such as linen, cotton, bouclé, or faux suede. Allow 20–30 cm extra fabric on each edge when wrapping around the frame.
- Tufting hardware: decorative buttons (or discs) and strong cord or thick thread. For a 180×200 cm headboard with a diamond grid, plan for ~37 buttons or adjust to taste, use plastic or covered buttons for easy maintenance. Keep spares.
- Adhesive and fasteners: a strong fabric glue or upholstery adhesive, a furniture staple gun with appropriate staples, wood glue, metal brackets or corner braces for rigidity.
- Edge finishing: sharp scissors, a back-facing stapler, and corner clips or upholstery nails/tacks if you want a traditional finish on the back or sides.
- Tools: measuring tape, pencils, a protractor or a square for tidy angles, a drill with wood bits, a jigsaw (if you’re shaping the frame), pliers, and a utility knife.
- Marking aids: a perforated board or pre-cut templates can help you lay out a precise diamond grid before drilling holes.
Preparing the frame: building a solid backbone
The frame is the backbone of a long-lasting capitonné headboard. If you’re adapting an old frame, begin with a thorough inspection. Look for signs of weakness, such as cracked joints or loose panels. Reinforce with metal brackets and wood glue where necessary. If you’re starting from scratch, assemble a frame from timber or MDF that can comfortably support the weight of foam, fabric, and the tufted surface.
Here is a reliable approach to framing:
- Measure the exact bed width and determine the finished headboard height you want. Cut the frame to size with a small margin for wrap-around fabric.
- Secure cross-members at regular intervals to prevent warping and to distribute weight evenly. Use wood screws and glue, tightening firmly.
- Attach the frame to a secure back panel or directly to the bed frame using metal brackets or strong screws. Ensure the assembly is perpendicular and perfectly level.
- Prepare a mounting solution for easy removal or repositioning if needed. A simple method is to attach slotted brackets to the wall or bed frame so the headboard can be unfastened if you change the room layout.
Marking the tufting grid: planning the diamonds
A precise grid is essential for an even, professional-looking capitonné surface. If you’re comfortable freehanding, you can mark the grid with a pencil and ruler, however, many designers opt for a perforated board or template to ensure symmetry and alignment.
Practical steps to mark the grid:
- Find the exact centre of the headboard. Mark the central point with a bright indicator so it’s easy to locate.
- Decide on your pattern: a classic diamond layout uses evenly spaced diagonals. A common approach is to set the horizontal and vertical spacing between tuft points at 6–8 cm, then draw diagonal lines to form the diamonds.
- From the central point, establish the first set of grid points in all directions. Number or label the positions so you can transfer them consistently to the fabric later.
- Optionally, use a perforated board laid flat over the headboard to transfer marks. This makes drilling and needlework more straightforward and repeatable.
Marking must be accurate. The accuracy of your tufting grid determines the uniformity of folds and the overall elegance of the final piece.
Padding and fabric: upholstering the surface
Padding creates the forgiving, cushioned surface that defines capitonné design. A double layer of foam gives depth and a luxurious feel. The fabric is then stretched over the padding and secured along the back, with excess material folded neatly to avoid puckers.
- Attach foam to the frame: Cut two identical foam sheets slightly smaller than the frame’s inner dimensions. Use an aerosol or contact adhesive or a light spray glue to bond the layers, ensuring the foam remains flat and even. Do not allow foam to extend beyond the front edge of the frame, as protruding foam can distort the ultimate shape.
- Lay the batting: Place a layer of batting over the foam. This softens the transition between foam and fabric and helps to smooth any minor irregularities in the frame.
- Cover with fabric: Drape the fabric over the padded surface with generous margins (20–30 cm on each side). The extra fabric will wrap around the frame edges and be secured on the back side.
With the fabric in place, gently pull it taut from the centre outwards to avoid puckers. Secure the fabric along the top edge with staples or tacks, then work down the sides and bottom, keeping tension even and crisp along the grid.
Tufting and buttoning: creating the diamond with cords
Tufting is the defining feature of capitonné. Each button is pulled through from the fabric surface and anchored at the back with a knot and cording. There are several approaches, the most straightforward uses a decorative button and a strong cord passed through matched holes on the back of the frame.
Steps to tuft the surface:
- Drill small holes through the foam and frame along the marked grid, precisely where you placed your tuft points. The hole diameter should accommodate the cord you’re using without tearing the fabric.
- For each tuft, thread a button with a length of sturdy cord or elastic. The cord should be long enough to pass through the fabric, foam, and frame, with enough length left at the back for a secure knot.
- From the front, insert the button and pull the cord through from behind. Create a tight pull so the fabric gathers neatly around the button, forming a defined diamond shape on the surface.
- Back at the rear, tie off the cord securely and trim excess. The knot should be robust enough to withstand repeated use without loosening.
As you place each tuft, pause to adjust the fabric so that folds travel consistently toward the same direction. This prevents uncontrolled pleating and ensures a disciplined pattern across the entire surface.
Edge finishing and back cover: a clean, professional finish
After the tufting is complete, finish the edges with clean folds. Trim any excess fabric and wrap the sides around the frame, securing with staples along the back edge. A neat finish on the back is particularly important if the headboard will be visible from both sides or if you prefer a freestanding panel that can be moved with ease.
For a simple, economical back, you can cover the entire reverse surface with a single piece of fabric, using small upholstery nails or staples to fix it into place. A neat back not only improves aesthetics but also protects the padding from abrasion and wear over time.
Design options: exploring forms, textures, and palettes
A capitonné headboard need not be strictly traditional. Here are several routes to modernise and personalise the look while maintaining the technique's signature charm.
- Frame shapes: A rectangular panel is the classic choice, but you can introduce curves at the top, or winged sides that extend beyond the mattress width. Winged headboards can create a cosy, cocooning feel and work well in compact bedrooms.
- Pattern density: Tight diamonds create a formal, meticulous appearance, larger spacing yields a more relaxed, contemporary vibe. Adjust the grid to suit the proportion of the bed and ceiling height.
- Colour and fabric combinations: Lighter fabrics (e.g., natural linen or cotton) pair well with milky walls and wooden floors, while deep velvet or faux leather brings a theatre-like sophistication to darker rooms. Consider a fabric with a subtle texture to maximise depth without introducing glare from lighting.
- Button and cord options: Use fabric-covered buttons for a unified look or contrast with leather or metallic discs to emphasise the tufting grid. Choose cords in a colour that complements the fabric for a refined edge.
- Integrated lighting and accessories: Plan lighting along the upper rim of the headboard or install discreet wall-mounted lamps to accentuate the diamond pattern. Small shelves or a slim ledge on either side can provide practical storage or display space without overpowering the surface.
Care, maintenance, and longevity
A capitonné headboard is a premium feature, but it can be surprisingly low maintenance with regular care. Here are practical tips to keep it looking sharp for years:
- Cleaning: Vacuum the surface periodically with a soft brush attachment to remove dust from the tufting crevices. For fabric that allows, a fabric-safe upholstery cleaner can be used sparingly on small stains. Always test on an inconspicuous area first.
- Sunlight and fade: Position the headboard away from prolonged direct sunlight to reduce fading and fabric wear. If you cannot avoid sun exposure, consider UV-protective curtains or a light protective coating for the fabric.
- Rotation and wear: Offer even wear by rotating cushions or changing the bed’s arrangement in the room. The tufted surface is resilient, but heels, pet claws, or sharp objects can impact the fabric over time, so manage access accordingly.
- Repairs: Minor loose threads or slight sagging can be addressed by re-tightening the corresponding tuft knot and applying a touch of glue to the cord backing if needed. For more significant loosening, it may be necessary to remove the fabric and re-tuft the affected area.
Budget, timeline, and practical tips
Costs vary with materials, fabric quality, and whether you repurpose an existing frame or build a new one. A mid-range project for a European double-to-king size can be budget-conscious if you source second-hand frames, economical fabrics, and standard foam. Expect the following ranges as a rough guide:
- Frame and hardware: €50–€150, depending on whether you use recycled components or new timber/MDF.
- Foam and batting: €40–€120, scaling with thickness and quality of foam.
- Fabric: €40–€200, heavily influenced by material choice (linen and cotton mid-range, velvet or bouclé higher-end).
- Tufting accessories: €15–€60 for buttons and cord, plus staples and glue.
- Tools: If you don’t own them, you may incur initial costs for a staple gun, drill bits, and scissors, many DIYers invest once and reuse for future projects.
Implementation time depends on experience. A careful, methodical approach typically spans 2–4 days for a complete headboard, including planning, framing, padding, tufting, and finishing. Rushing stages may compromise both the durability and the finish. Plan for a relaxed pace, measure twice, cut once, and enjoy the process.
Safety considerations and best practices
Because the headboard is a functional element that sits close to the sleeping area, prioritise safety and durability:
- Ensure all edges are smooth and there are no protruding nails or screws that could snag fabric or injure skin.
- Double-check the frame’s rigidity, a loose frame can distort the tufting and cause fabric wear. Reinforce joints with brackets or cross-members as needed.
- When drilling through the frame, mark drilling points carefully to avoid splitting the wood or MDF. Use proper drill bits and take care to avoid damaging the upholstery surface.
- Use skin-safe glues and avoid damp offcuts, which can compromise the frame or fabric over time.
Final thoughts: a craftable luxury for modern European homes
A capitonné upholstered headboard is more than a decorative feature, it embodies a craft-inspired approach to modern living. By reusing a sturdy frame, selecting durable materials, and following a thoughtful grid layout, you can achieve the refined, timeless look of a boutique hotel in your own bedroom. The result is a comfortable, visually striking backdrop that complements a wide range of interior schemes - from the soft neutrals of a Scandinavian-inspired space to the rich textures of a contemporary European apartment.
Frequently asked questions
To help you troubleshoot common concerns, here are concise answers to typical questions about capitonné headboards.
- Can I tuft without a professional sewing machine? Yes. Many tufts are hand-tufted using a strong needle and cord. A basic toolkit is sufficient to achieve excellent results with patience.
- What if I don’t have a power drill? Manual drilling with a hand drill or spiked awl can work for softer frames. Alternatively, consider pre-drilled panels and use traditional hand tools to fit the grid.
- Which fabrics are easiest to maintain? Fabrics with tighter weaves and natural fibres like linen or cotton blends offer balance of durability and breathability. Velvet requires careful cleaning but delivers a luxuriousAppearance, faux leather is easier to wipe clean and repels stains, though it can feel less breathable.
With careful planning and a steady hand, your capitonné headboard can become a long-lasting feature that enhances both comfort and style in a European bedroom. The craft is approachable, the results are timeless, and the process invites a personal touch that reflects your living environment and taste.
You may also like these articles
Designing European Private Yards: Plan, Plant, and Perfection
A practical guide to crafting serene, functional private yards across Europe.
Budget-smart Renovation: European Designer Secrets for a Modern Home
Practical, stylish renovation tips for European homes on a budget.
Clever Kitchen–Living Room Design: Zoning, Layouts and Details for European Homes
Master the art of a cohesive kitchen–living space with European zoning tricks and timeless style.