
Explore interior trends, AI design insights, styling guides and real transformations
Handcrafted Christmas Gnomes: A European DIY Guide for Stylish Homes
Introduction: a timeless festive tradition for European homes
Throughout much of Europe, winter decorating invites small, humanoid figures with long beards and tall, pointy hats. Known for bringing humour, warmth and a sense of whimsy, handcrafted Christmas gnomes have become a beloved accent in homes ranging from compact city apartments to generous countryside houses. This guide translates a traditional craft into a contemporary, design-conscious project suitable for modern interiors. You will learn how to select materials, assemble a durable structure, and finish your gnome with decorative touches that suit various Nordic, Alpine and continental European aesthetics.
What you will need: fabrics, fillings, and essential tools
Fabrics and fur
Choosing the right textiles is fundamental to how your gnome will look and feel. The aim is to combine warmth, texture and structural integrity, while keeping interiors cosy rather than cluttered. Consider a palette inspired by winter neutrals, with occasional colour pops for festivity. Common fabric choices include:
- Fleece and felt: dense yet soft, these fabrics hold shape well and do not fray, making them ideal for the torso and limbs.
- Cotton and linen: lighter, with good tension for limbs, noses and small features. They’re easy to sew and dye or print if you want patterning.
- Velvet, velour and satin: luxurious options for the hat or tunic, adding depth and sheen for a more festive look.
When planning your colour scheme, many designers favour a tonal base with light accents, or a classic combination of white or silver with red for a quintessentially festive appearance. For the hat and body, use a solid colour, for hands and legs, a busier pattern can work if balanced with calmer sections elsewhere.
Bearing in mind European fabric cautions
Avoid very slippery fabrics (for example certain polyesters) and very heavily woven or peeling materials that can hinder clean edges. Steer clear of fabrics that shed excessively at the edges (such as some loosely woven wool or chiffon) and avoid transparent or open-weave textiles for the core body, unless you are using a stabilised lining. Always test fabric scraps before committing to large pieces.
Beard materials: natural texture, or curated fibre
The beard is a defining feature. Options include:
- Thick yarn fringe: quick and fun, but can be less voluminous than other methods.
- Long-pile faux fur: creates a lush, natural-looking beard when cut into a shape and brushed or teased to increase volume.
- Wool roving or felting wool: highly versatile, allowing you to tailor density and waviness for a more authentic beard.
Filling: soft, dense, or weighted
Filling choices determine how the gnome sits or hangs and how tactile the piece feels. Consider these options:
- Soft fillings (polyester fibrefill, hollow-fill) for hanging displays or light-weight versions that won’t pull on seams.
- Mid-weight fillings such as unbleached wool or mixed fibres for hand-held, slightly posable figures - great for children’s play.
- Weighted fillings (small grains such as barley, oats, or rice) for standing gnomes that require a sturdy base. If using grains, first encase them in a strong inner pouch to avoid leaks and to simplify cleaning.
For a tactile, scent-enhanced option, you can place a sachet of dried herbs or a drop of essential oil near the core, ensuring it is securely enclosed so it does not contact the outer fabric.
Tools: precise, tidy and reliable
Having the right tools improves both the process and the final finish. Essential items include:
- Quality fabric scissors and a sharp pair of embroidery scissors for fine details.
- A tailor’s chalk or erasable fabric marker to trace patterns cleanly.
- Needles suited to the task: a slender needle for small parts and a larger one for sturdy seams, consider a sewing machine for larger pieces if you prefer.
- Strong thread in coordinating colours, plus a synthetic thread for durability.
- A hot glue gun or fabric glue for non-sewing attachments like the beard or nose.
- Pattern templates printed at the correct scale and a supply of light cardboard for internal supports.
Tip: use a marking pen that disappears with heat or washing for temporary lines, and keep pins and needles organised to avoid accidents during longer builds.
Pattern and templates: getting the scale right
Pattern confidence pays off in a crisp finish. Print a square-foot pattern at 1:1 scale, or scale up/down as needed to fit your fabric width. You will typically need two circular bases for a standing gnome, and several pieces for the torso, arms, and hat. Cut a small cardboard circle to reinforce the base inside the torso so the gnome sits firmly on a shelf or table.
Masterclass: building a classic standing gnome
With all materials prepared, you can begin. The following steps describe a traditional standing gnome with a sturdy torso, a long beard and a tall hat. Adjust proportions to your preferred size by selecting a larger or smaller pattern scale.
- Prepare the materials: lay out the fabrics, filling, beard material, nose bead, and the card base. Have the pattern pieces at hand in the order you intend to cut them.
- Trace and cut: lay the pattern on fabric, trace with chalk, and add 1 cm seam allowance. Cut the torso front and back pieces, the hat, the arms, and the legs if you’re including them. Cut a circular base for the torso using the inner template and a second circle for the bottom.
- Sew the torso: with right sides together, sew the two torso pieces from the top to the bottom, leaving open the shoulder seams. Clip curves and press the seams flat. Repeat for the legs or any additional limbs if included.
- Attach the base: align the torso with the circular base. Sew or glue along the bottom edge, forming a shallow, conical body which gives stability for standing placement. Turn right sides out and ensure a neat finish at the seam line.
- Incorporate internal support: place the reinforced cardboard disc inside the torso near the base to provide rigidity and help keep the gnome upright.
- Prepare limbs: thread and sew arms and any legs. If you plan for mittened hands, cut out small fabric pieces, stuff lightly, and attach to the sides of the torso. Position the arms so they frame the body attractively and look natural when the gnome is placed on a shelf.
- Create the beard: cut beard material to a triangular shape and trim the edges to create a natural, flowing fringe. If using faux fur, brush it into place to emphasize volume. Attach the beard with hot glue or by stitching just under the nose line so the beard looks full and natural.
- Make the nose: attach a bead or create a small fabric ball (about 2–3 cm in diameter) filled with soft stuffing. Position it above the beard, slightly protruding, to simulate the gnome’s nose.
- Assemble the hat: sew the hat pieces into a tall cone, leaving the base open to slide over the head. Once the hat is scaled to fit, slip it over the head and secure it with a few stitches or a dab of glue. Position the hat so it partially covers the face and meets the beard volume at the front.
- Finish the look: adjust the beard and hat, then secure any remaining seams. If you prefer, decorate the hat with a colour-matched ribbon or a small fabric pompom on the tip for extra charm.
- Optional accessories: add small felt boots or wrap a fabric belt around the torso for a more defined silhouette. If you desire legs, cut two fabric rods, stuff lightly, and attach beneath the body so the gnome stands more rigidly.
When you finish, gently re-shape the beard and hat so their lines are clean and the overall expression reads as friendly and festive. A well-balanced gnome should stand confidently for display and be pleasant to touch during winter evenings.
Variants: how to personalise your gnome
Beyond the classic standing gnome, there are several appealing variants that suit different spaces and crafts skills. Each variant preserves the essential charm while offering new textures and silhouettes.
The gnome girl
To create a gnome girl, substitute the beard with two braids made from wool roving or yarn. Attach the braids close to the hat’s edge, allowing them to cascade down the sides of the body. A softer facial expression can be achieved by shaping the nose with a smaller bead and using a pastel palette for the body and hat. This simple alteration can yield a distinctly warm, feminine character without complicating the build.
Compact, simplified gnomes
If you are short on time or materials, you can craft a compact version using two pieces of felt in complementary colours, a long faux fur strip for the beard, a bead for the nose, and a small amount of light stuffing. Cut, stitch, and glue to assemble a friendly, desk-friendly gnome that can sit neatly on a windowsill or bookcase.
Gnomes from everyday items
A playful approach is to repurpose everyday objects. For example, a sturdy pinecone can become a head topped with a felt hat, a shorn piece of faux fur serves as a beard, and a wooden bead becomes a nose. This approach is especially satisfying when working with family or school-age children because it highlights resourcefulness and creativity with common materials.
Miniature gnomes for tiny spaces
For a group display on a windowsill, create several mini gnomes in a cohesive palette. Use small fabric scraps, light stuffing, and diminutive hats to form a gallery-like cluster. Grouping gnomes of varying heights can add visual rhythm to the arrangement while keeping the look uncluttered.
Alternative techniques: other routes to festive gnome decor
If sewing feels daunting or you prefer quicker results, consider these non-sewn approaches that still deliver charming results:
- Nose and head on a sock: fill a sock with lightweight stuffing to form a head, add a small felt hat and a faux beard cut from fabric or faux fur for a quick, quirky version.
- Cone-based gnome: construct a cone shape from sturdy cardboard or foam, cover with fabric, add a beard and nose beneath the hat for a streamlined, contemporary look.
- Natural elements: assemble a gnome using pinecones as heads, with beard threads woven from natural fibres and hats fashioned from felt or linen. This approach embraces an earthy, sustainable aesthetic perfect for rustic interiors.
These methods offer creative flexibility and can be aligned with regional seasonal décor schemes - from alpine chalet-inspired palettes to modern, minimalist interpretations.
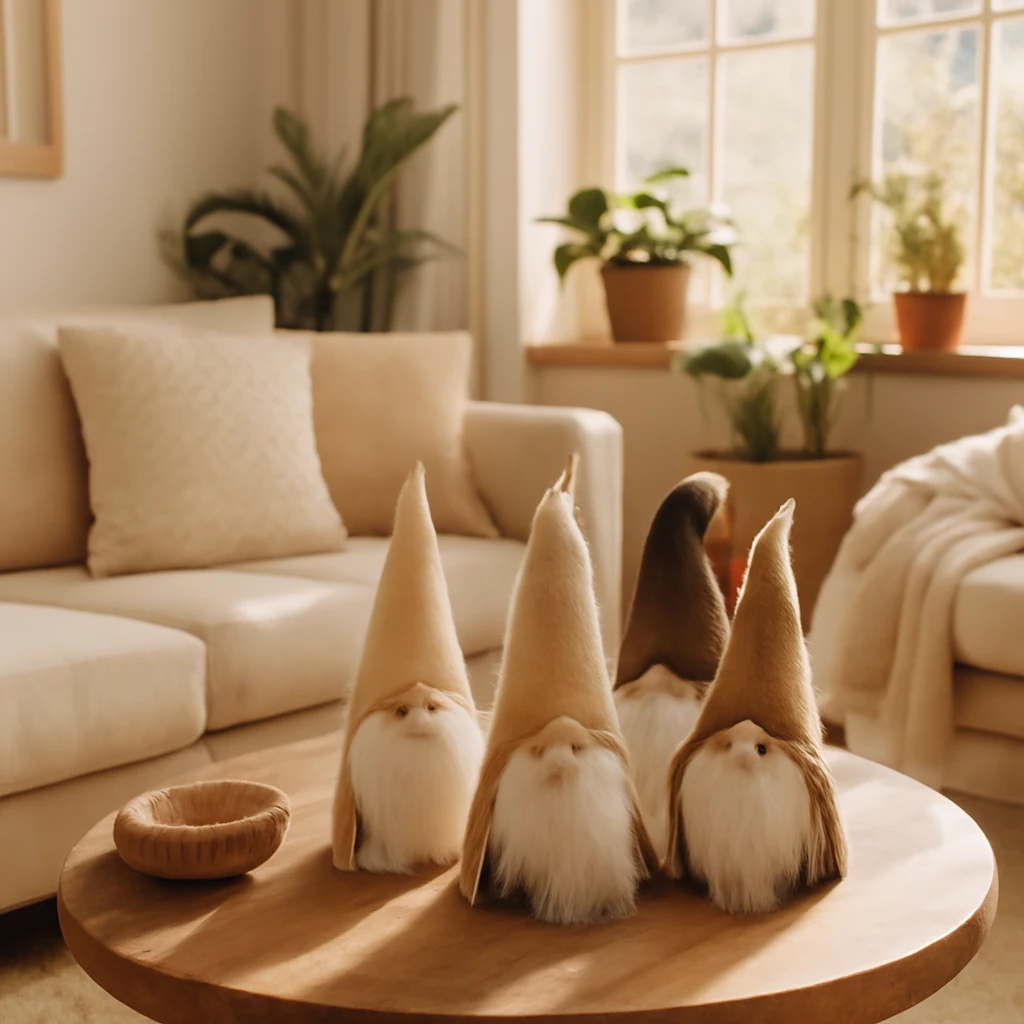
Decorative applications: where to place your gnomes
Gnomes are versatile decor accents that can anchor a room’s seasonal mood. Here are a few ideas aligned to European interiors:
- Windowsills: a row of gnomes in varying heights creates a playful winter tableau when framed by frosted glass or candles.
- Fireplace mantels: a cluster of three or five gnomes adds a cinematic focal point, particularly when paired with evergreen sprigs or metallic accents.
- Table centrepieces: a single larger gnome surrounded by fir cones, dried orange slices and a gentle light source forms a warm, inviting table centre.
- Desk companions: smaller gnomes can brighten a study or home office, complimenting natural wood finishes and soft textiles.
Care, storage and safety: keeping handmade gnomes in great shape
When stored properly, handcrafted gnomes last for many seasons. Consider these practical tips:
- Clean gently: remove surface dust with a soft brush or gentle vacuum attachment. Avoid soaking fabrics, spot-clean with mild detergent on a small test area if necessary.
- Protection from pests: store boxed gnomes in breathable packaging and add dried lavender or cedar chips to deter moths and other insects.
- Weight considerations: if your gnome uses real grains as filling, ensure the outer fabric is tightly sealed and the container is clean and dry to prevent odours or mould.
- Safety for children and pets: avoid sharp embellishments near play areas. Use non-toxic glues and secure all components firmly to prevent detachment during handling.
Maintaining European design language: sustainability and quality
Handmade decorations can become timeless pieces when crafted with durable materials and thoughtful details. Consider the following strategies to keep your gnome project aligned with European design values:
- Use fabric scraps and remnant pieces from other projects to minimise waste. This promotes an ethos of re-use while encouraging creativity.
- Choose natural or plant-based fillings where possible, and select dyes and finishes that are non-toxic and stable over time. This supports healthier homes and reduced environmental impact.
- Keep a cohesive palette across several gnomes. A restrained colour story - such as greys, taupes, ivory and soft reds - can be easily mixed with metallic accents for a modern look.
Final touches: styling tips for a polished finish
A few thoughtful touches can elevate the overall presentation of your gnomes. Consider these ideas:
- Incorporate texture: pair plush beards with smooth satin hats or matte wool tunics to create a tactile contrast that reads well in a neutral interior.
- Play with scale: vary heights across a display to create a dynamic silhouette. A trio of gnomes in ascending sizes often looks balanced.
- Lighting integration: place gnomes near a warm light source to highlight their facial expressions and textures without harsh glare.
- Seasonal scent: use sachets of cinnamon or orange peel in the storage box for a gentle, festive aroma when you retrieve them next season.
From hobby to heirloom: making gnomes with a design-forward mindset
Crafting a Christmas gnome is more than a simple holiday project, it is an exercise in texture, colour balance, and proportion that translates into a personalised interior statement. By selecting materials with care, planning the pattern at the correct scale, and applying precise finishing touches, you create a unique decor piece that can be passed along through seasons and shared with friends and family. The result is not merely a decorative item, it becomes part of your home’s storytelling - an object that embodies craft, patience, and a sense of seasonal wonder.
Closing thoughts: embracing gnomes as part of European festive living
Whether you lean toward a Nordic-inspired monochrome approach, an Alpine cottage vibe, or a contemporary European palette, handmade gnomes offer a versatile and charming route to seasonal decor. They invite you to slow down, select textures thoughtfully, and pursue a finish that feels tactile and timeless. With the ideas and techniques shared here, you can embark on a flexible, enjoyable project that suits your space, your skills, and your environmental values - delivering festive warmth that lasts well beyond the holidays.
You may also like these articles

Epoxy Resin in European Interiors: Ideas, Techniques and Projects
Versatile epoxy resin ideas for stylish European homes.

Loft living in Europe: crafting an industrial-inspired home
Open plans, exposed finishes and bold textures define European loft living.

The Sofa Buyer's Blueprint: 8 Essentials for a Durably Stylish Couch
A practical guide to choosing a durable, comfortable sofa for European homes.