
Explore interior trends, AI design insights, styling guides and real transformations
30 Smart Storage Solutions for European Kitchens
Mastering Kitchen Storage in European Homes
Having tackled bathroom clutter, we turn our attention to the kitchen, where mislaid utensils and teetering tins can disrupt even the cleanest line. In many European homes, especially urban flats and compact townhouses, every square centimetre counts. The aim is calm, taught organisation that preserves functionality and style. Below are 30 practical ideas to optimise space, improve workflow and elevate the overall look of any kitchen.
Idea 1: Vertical storage
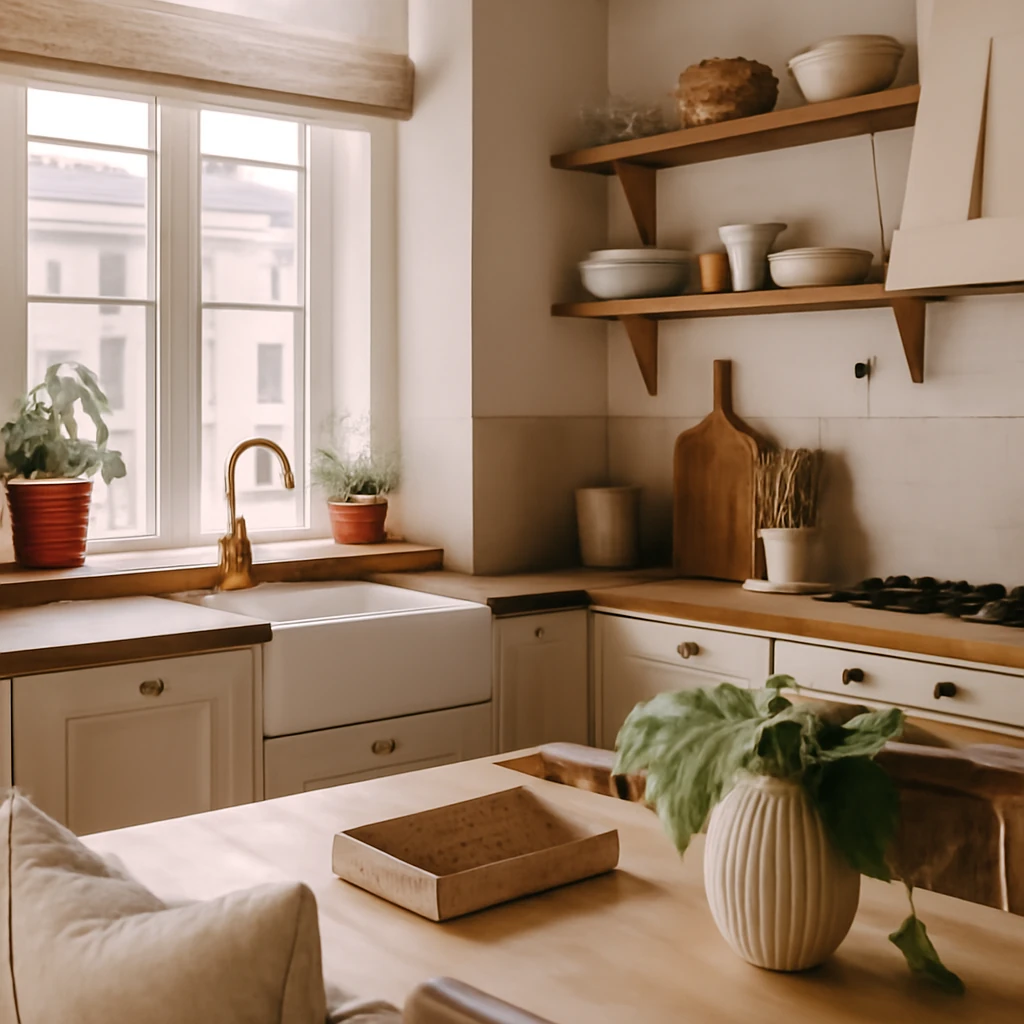
Vertical storage makes efficient use of narrow wall space. Install a sequence of tall, slim shelves or floor‑to‑ceiling wall cabinets with adjustable heights. A depth of 20–35 cm is usually sufficient for everyday plates, bowls and glassware, while keeping the work surface clear. Maintain a balanced rhythm: heavy items lower, lighter items higher, and neat alignment along each shelf to create a calm, organised zone.
Idea 2: Out of sight with pull‑out wire baskets
Inside cabinets, pull‑out wire baskets on telescopic slides keep cleaning products, detergents and bulk staples neatly tucked away yet easy to reach. Choose baskets around 8–12 cm deep, with wipe‑clean finishes. Label front edges for quick recognition, and group items by function - cleaning, dry goods, and cleaning tools - to minimise rummaging and preserve a tidy silhouette on the countertop.
Idea 3: Hanging baskets for vegetables
Under‑shelf or wall‑mounted mesh baskets create a dedicated zone for onions, potatoes, garlic and fruit. These baskets free up lower drawers and promote air circulation, helping produce last longer. Select rust‑resistant materials or powder‑coated metals in hues that harmonise with the kitchen palette. A well‑considered cluster of baskets can feel both practical and decorative.
Idea 4: Rails for horizontals
Horizontal rail systems mounted above the work surface enable you to suspend cups, utensils and small jars. Modern rails come with modular hooks, airtight spice canisters and pull‑out baskets. Position rails along the perimeter of the work triangle to keep essential tools within arm’s reach while keeping work surfaces uncluttered and visually light.
Idea 5: More chrome baskets
Introduce additional chrome wire baskets to increase breathable storage. They slot into existing cabinetry or rest on shallow shelves. Chrome finishes pair well with stainless steel appliances and a contemporary kitchen aesthetic. Aim for a consistent height grid so the composition remains orderly and easy to scan at a glance.
Idea 6: Perforated wall panels for pots and pans
A perforated metal panel mounted near the cooker or by the doorway offers a refined alternative to deep cupboards for pots, pans, lids and utensils. Use hooks or specialised clamps and group items by size or function. This approach eliminates endless rummaging and presents a professional, design‑led storage solution.
Idea 7: Corner storage innovations
Corners are notorious waste spaces, convert them with dedicated corner cabinets or pull‑out trays. Consider a rotating carousel or a wedge‑shaped pull‑out with soft‑close drawers to keep pots and lids accessible without sacrificing floor space. Custom angles and thoughtful hardware ensure smooth operation in busy kitchens.
Idea 8: Drawer dividers for function
In drawers, adjustable dividers create dedicated lanes for cutlery, utensils and measuring tools. A well‑defined organisation scheme reduces rummaging and speeds up cooking. Pair with non‑slip mats to prevent items from sliding during use and to maintain a tidy, intact toolkit for food prep.
Idea 9: Magnetic knife strip
Mount a magnetic knife strip on the backsplash or a side wall to free drawer space and keep blades visible and within easy reach. Choose a corrosion‑resistant magnet and a slim, unobtrusive strip to preserve a minimalist, contemporary kitchen look. Regularly clean the strip to maintain grip and safety.
Idea 10: Magnetic spice jars
Store spices on a magnetic strip or on the inside of cabinet doors or the fridge. Opt for uniform jar shapes with clear lids to easily identify contents. This not only adds a neat, orderly display but also makes it simple to grab the right spice mid‑cooking.
Idea 11: Tall stands for pots and pans
Use vertical risers and tall stands to exploit the vertical dimension inside cupboards. Layer pots and pans on different levels, and store lids in a dedicated rack or on a slim slider within the cabinet. The result is a drawer‑free, easy‑to‑navigate arrangement that frees shelf space for bulk items.
Idea 12: Simple rod for lids
Attach slender rods or bars to a wall or inside a cabinet door to hold lids and rack them in a tidy stack. A few well‑placed rods can dramatically reduce clutter and prevent lids from slipping into a tangle at the back of a shelf.
Idea 13: External shelves for lids and trays
Metal shelves or slim, wall‑mounted compartments can hold lids, baking sheets and trays. If a cabinet is already full, consider placing a compact shelf on the outside of the cabinet for quick access to frequently used sheets and trays. A clean, Japanese‑inspired aesthetic can emerge from restrained, open shelving.
Idea 14: Vertical door storage
Add a vertical organiser to the interior of a cabinet door to keep packets, tins and small boxes in view. A slim, 2–3 cm pocket or wire rack maximises the door’s potential and keeps the main shelf free for larger items.
Idea 15: Foil and film storage on the wall
Mount a simple wall solution to corral rolls of foil, parchment and plastic wrap away from the worktop. Recycle an old wall rack or create a purpose‑built holder that keeps these frequently used items visible and easy to grab while cooking.
Idea 16: Mobile spice zones
Introduce mobile trolleys or small freestanding shelves inside a cabinet to house spice jars. The ability to slide or roll the unit enables you to locate ingredients quickly, which is especially valuable when following a recipe or cooking with a large group.
Idea 17: Clip to control crumbs
Prevent crumb spillage in the pantry or drawer by clipping packaging with a simple peg or binder clip. A small, practical addition can keep baked goods orderly and make routine cleaning easier, with no mess left behind after use.
Idea 18: Lids and labels
Label container lids and jars to speed up the process of finding cereals, flour and rice. A marker on the lid or a small printed label keeps every item in its place and reduces the guesswork during busy cooking sessions.
Idea 19: Centralised recipe storage
Consolidate recipes in one place, whether in a small notebook, a kitchen binder or a dedicated digital folder. Alphabetical or category‑based organisation minimises distraction and helps you locate instructions swiftly when you’re mid‑recipe.
Idea 20: Cups and glasses near the work zone
Re‑imagine wall zones by hanging coffee cups on rails and storing wine glasses upside down beneath the shelves. This arrangement keeps glassware off the lower drawers and creates a tidy, efficient display that’s easy to maintain.
Idea 21: Long slim shelves for spices
Install long, slender shelves along an interior wall to hold spice jars, oils and small bottles. A continuous row makes it easier to locate items at a glance and encourages you to rotate seasonal favourites while keeping the current workspace clear.
Idea 22: Top‑of‑cabinet storage for seldom‑used items
Reserve the highest shelf for rarely used items, such as seasonal china or bulky platters. Use clear containers to scan contents quickly and prevent items from gathering dust. A light, legible system reduces the mental load during everyday cooking.
Idea 23: Modular stacks for awkward corners
Modular stacks, stackable shelves and pull‑out units can reach into awkward corners and narrow pantry recesses. The aim is to maximise every square centimetre with flexible components that adapt to changing needs over time.
Idea 24: Uniform spice containers
Collect spices in standard jars and use a consistent labeling scheme. A uniform container system optimises space and delivers a cohesive, tidy look across the kitchen, making it easy to navigate your spice cabinet.
Idea 25: Open shelving as design feature
Open, slim shelves can display favourite dinnerware while keeping it readily accessible. Group items by height and place the most‑used pieces at eye level. This approach combines practical storage with the opportunity to curate a tasteful, ever‑present decorative element.
Idea 26: Cutting‑board rack
Keep cutting boards upright using a compact rack to separate them from the sink and prevent warping. Choose a moisture‑resistant material - such as coated metal or synthetic rattan - for durability in a humid kitchen environment.
Idea 27: Budget‑friendly reuse
Don’t discard old tins or weathered tools, with proper preparation, they can become clever storage containers for spoons, forks and spatulas. A little sanding, a coat of paint and a few pre‑drilled holes can yield appealing, functional organisers at low cost.
Idea 28: DIY magnetic organisers
Create magnetic storage for small items using inexpensive baskets, magnets and a dab of strong glue. This custom solution offers practical storage without breaking the bank and can be tailored to any kitchen layout.
Idea 29: Fridge sorting containers
Use stackable, transparent containers to sort leftovers, vegetables and snacks inside the fridge. Clear volumes help you monitor contents and reduce waste. Pair with a simple label system to guide restocking and keep everything easy to locate.
Idea 30: Lower storage for grains and craft supplies
Leverage the lower cabinetry with pull‑out baskets or compartments for dry goods like pasta, rice and flour, as well as hobby materials close to the workspace. Consistent organisation across drawers and baskets saves time and enhances cooking flow.
In summary, effective kitchen storage is about deliberate planning, adaptable systems and a calm, coherent aesthetic. Start with a layout audit: identify the most‑used zones, measure available wall space and evaluate cabinet depths. Then build a language of storage that repeats across the kitchen - colours, finishes, and hardware that reinforce a cohesive look. Finally, allow for flexibility: as recipes, family sizes and routines evolve, your storage should flex with you, never constrain you. The result is a kitchen that looks effortless, feels calm and functions without friction.
You may also like these articles
Gas pipes in European kitchens: 10 lawful design ideas for a seamless look
Balancing safety and style: compliant kitchen pipe décor across Europe.
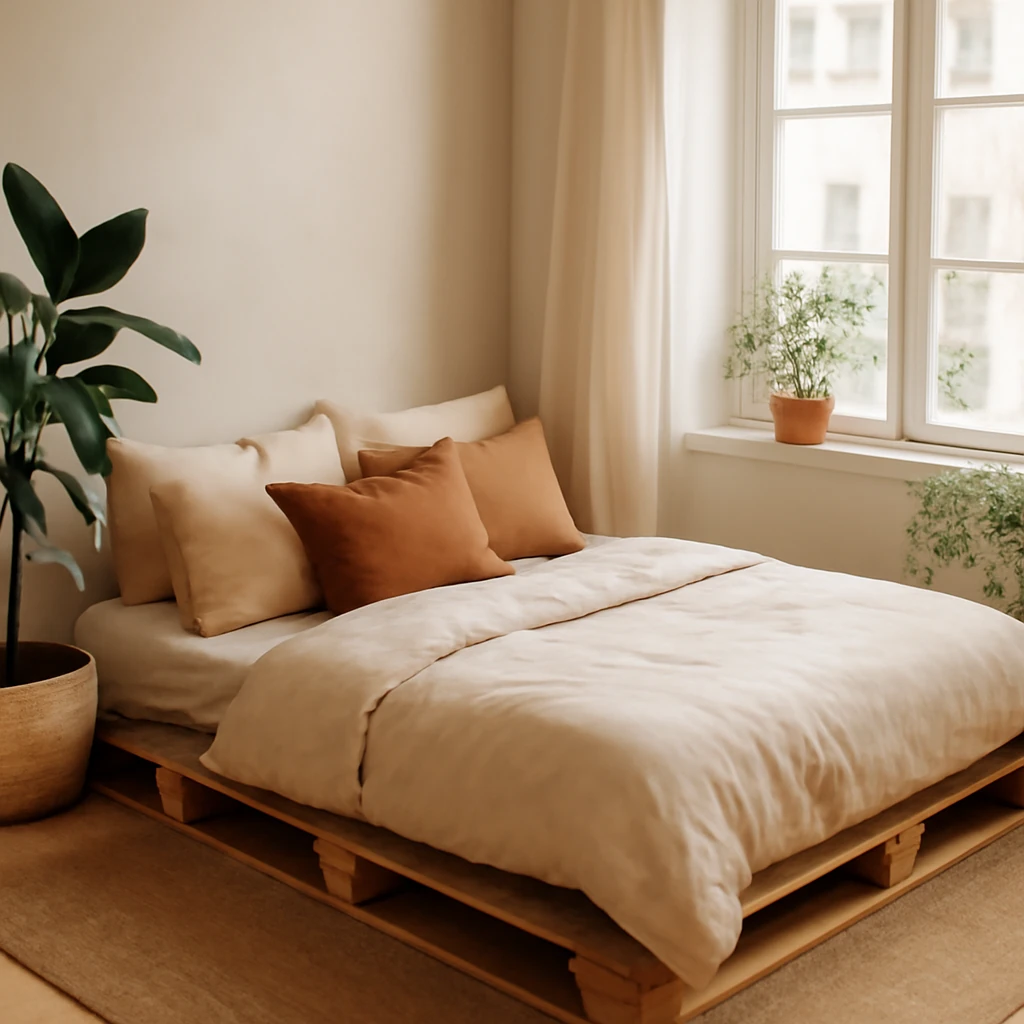
DIY Pallet Bed: A European Guide to Sustainable Sleep
Create a stylish, affordable pallet bed with smart finishing and storage ideas for European homes.

Colour, Circles and Calm: The Itten Wheel in European Interiors
A practical guide to using the Itten wheel for harmonious European interiors.